This article explains how to disassemble the ISUZU 6WF1-TC Engine
04.2023 ISUZU E-IDSS Diagnostic Software Download and Installation Service
·Attach wires securely to the engine,and hoist it.
·Do not position yourself underneath the engine while it is being hoisted.
·Never put your hands where they may be pinched or sandwiched.
·The engine is heavy so proceed with the work with all due care.
1.Battery cable
Disconnect the battery cable from the negative terminal (1).

2.Exhaust pipe
3. Transmission assembly For details on removing or installing the transmission assembly, refer to the chapter entitled
"Removing or installing the transmission."

4.Drain off the cooling water.
Drain off the cooling water from the drain plug of the radiator and drain plug of the engine.

ISUZU IDSS MX2-T Diagnostic Adapter System Support G-IDSS/US-IDSS/E-IDSS(Included DHL Shipping )
5.Inter-cooler hose

6.Radiator hoses
Disconnect the harness attached to the upper hose.At this time,remove the harness bracket attached to the radiator as well before proceeding. Disconnect the air purging hose,upper hose and lower hose

ISUZU G-IDSS Diagnostic Service System 10.2023 Download and Installation Service
7emove the bolt for the oil level gauge attached to the radiator assembly,and put it to one side so that it will not get in the way.
8.Oil filler pipe Disengage the clip of the heater hose attached to the oil filler pipe,and remove the oil filer pipe.
9.Side noise cover
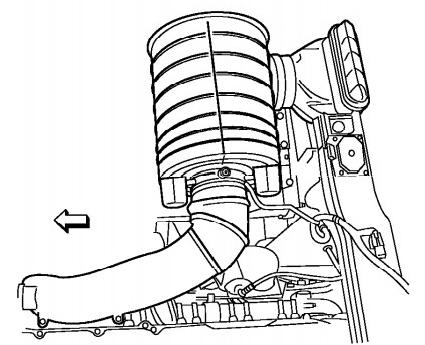 10.Air cleaner assembly
10 .Disconnect the air duct and connector,and remove the air cleaner together with the bracket.
11.Exhaust pipe front and exhaust brake
Remove the heat protector,and remove the exhaust pipe front and exhaust brake.

12.Exhaust pipe front and exhaust brake
Remove the heat protector(2)and then the exhaust pipe front (1)and exhaust brake (3).
13.Cab back member
Remove the cab back member noise cover (2).
Remove the oil tank(1)of the power steering pump.
11.2023 ISUZU US-IDSS Diagnostic Service II Truck Diagnostic System Download and Installation
14.A/C compresso
Remove the belt for the A/C compressor and
harness connectors.
Remove the four A/C compressor mounting bolts and the gas pipe clip,and put the A/ C compressor to one side so that it will not get in the way.
At this point in time,do not disconnect the gas pipe from the A/C compressor
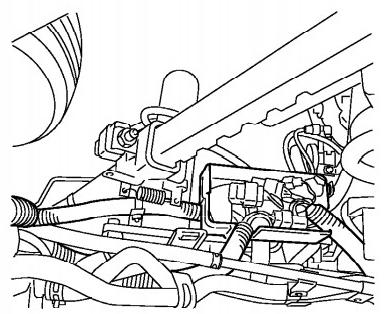
15.Generator wires
16.Starter wires
17.Dual thermo sensor connector
18.Oil pressure sensor connector
19.Engine harness connector
Disconnect the connectors.
20.Sub tank hose
Disconnect the air purging hose and charge pipe.
 21.EGR valve air hose
Disconnect EGR valve air hose.
22.Air cylinder hose
Disconnect the air cylinder hose.
23.Air compressor hose
Disconnect the air compressor hose.
24.Power steering pump
Remove the two mounting bolts,and remove the power steering pump.
Do not remove the oil pipe of the power steering pump at this point in time.
Release the oil pipe of the power steering pump, and put the power steering pump with oil pipe attached to one side.
25.Engine speed sensor connector
26.Shift selector rod

27.Ground wire
Cut the connection between the starter ground and
frame ground (1)

28.Fuel hose
Cut the connection between IN and OUT of the
fuel hose.At this point in time,drain the fuel filter
as well.
29.Engine mounting
Install the engine hangers from the right to front and from the left to rear,attach wires securely,and cut the engine mounting connections.
30.Engine assembly
Hoist the engine slowly,and remove it.Do this work while taking care to avoid interference with other parts.
Never position yourself underneath the engine when it is being hoisted


没有评论:
发表评论